redux-time
![]()
redux-time: Functional, declarative, redux animation 


| ▶️ Intro | Walkthrough | Info & Motivation | Links | Documentation | Examples | Source |
redux-time is a library that allows you to deterministically compute your state tree as a function of time. It’s primarily used for animations, but it can also be used for generically changing any redux state as time progresses.
It’s likely if you’re looking for a web animations solution, you’re probably trying to either do:
- minor content transitions (e.g. photo gallery transitions, hover dropdowns) or
- full-blown interactive dynamic animations (like for games)
redux-time is designed for the second case. If you want simple CSS content transitions and aren’t building complex videogame-style animations, check out react-transition-group (basic) or react-move (advanced) instead.
Ok now that we’ve gotten that out of the way, we get to the fun part with the nice shiny progress bars:
npm install redux-time # 🎂
Check it out in action on the full demo page, or follow the walkthrough example below.
At Monadical we use redux-time for animating ethereum-backed browser-based poker (come help us build it!).
Key Features
- all state is a function of the current point in time
- define animations in Javascript or with CSS @keyframes
- time-travel debugging (e.g. slow down, reverse, jump to point in time)
- compose animations with pure functions e.g.:
Repeat(Rotate(...), 10) - seamlessly animate existing React + Redux codebase without major changes
- animate any state tree value manually, or use provided Animation functions for common animations e.g.:
Translate,Rotate,Opacity - it’s knock-your-socks-off fast, just tun
benchmarks.jsto see for yourself. On a test laptop we get animated state computed at over 100FPS with 5000 concurrent animations. The bottleneck is usually rendering–check out three.js for 3d rendering, or Canvas for 2d, or Inferno for react animating - fully compatible with CSS animation libraries like Animate.css, you already have access to 1000s of pre-written animations out there that plug right into
redux-time!
Intro
Redux-time makes complex, interactive, composable animations possible by using the redux single-source-of-truth state tree model, and extending it with the idea of time.
Redux is already capable of time-travel currently, however you cant slow down the speed of time, reverse time, or jump to a specific point in time since redux only knows about the list of actions and has no first-class concept of time. This library makes time a first-class concept, and gives you careful control over its progression.
What that means specifically, is that every time a TICK action is dispatched with a warped_time parameter, the animations reducer looks through the active animations in animations.queue, calls their respective tick functions with a delta parameter, and uses their output to render a state tree at that point in time.
Every tick function is a pure function of the start_state, end_state, and delta from start_time. This makes animations really easy to reason about compared to traditional solutions. Debugging is also drastically simpler, since you can slow down and even reverse the flow of time to carefully inspect animation progress!
Walkthrough Example
import {animationsReducer, startAnimation, Animate} from 'redux-time'

// 1. Create a redux store, and start the animation runloop with initial state
const store = createStore(combineReducers({animations: animationsReducer}))

const initial_state = {ball: {style: {}}}
const time = startAnimation(store, initial_state)
// 2. Set up our first animation
const move_ball_animation = Animate({
    // move the ball 20px down over 1s
    path: '/ball/style/top',
    start_state: 0,
    end_state: 20,
    duration: 1000,
})

document.onkeypress = (e) => {
    // trigger it when the down arrow is pressed
    if (e.keyCode == 40) {
        store.dispatch({type: 'ANIMATE', animation: move_ball_animation})
    }
}
// 2. Create a component to display our state
const BallComponent = ({ball}) =>
    <div style=></div>

const mapStateToProps = ({animations}) => ({
    ball: animations.state.ball,
    // optionally deepMerge(other_state, animations.state)
})
const Ball = connect(mapStateToProps)(BallComponent)
// 4. Then render it
ReactDOM.render(
    <Provider store={store}>
        <Ball/>
    </Provider>,
    document.getElementById('react')
)
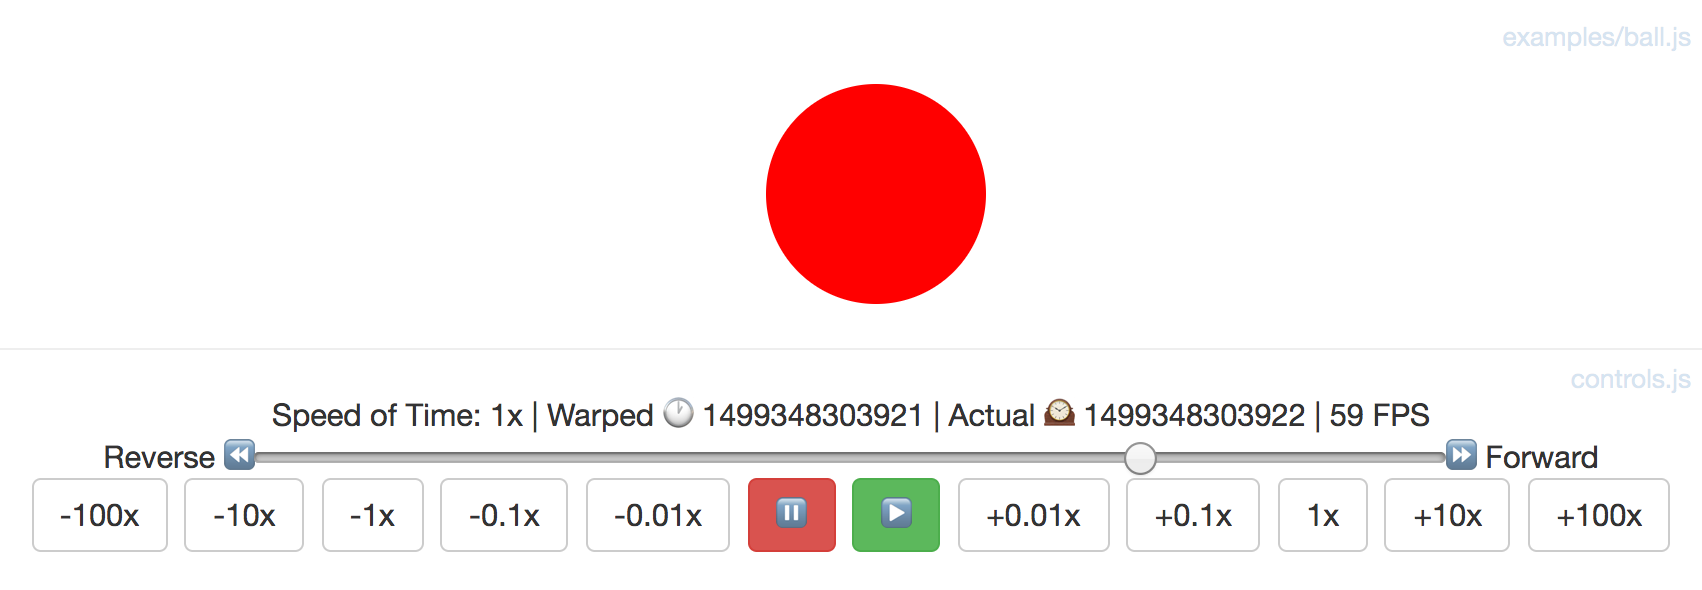
You’re done! The proper intermediate state is computed from the animation and rendered on every tick, and the ball moves on the screen!
See the demo of this code in action here: ball.html, and the full code for the example in examples/ball.js
Info & Motivation
There are lots of different approaches to animation out there right now:
- start_state + css transition + callback when finished (see react-f1)
- component-lifecycle hooks like onRemove + css transitions (see react-transition-group)
- animation functions + a runloop + a timeline controller (see GSAP)
Redux-time shares some similarities to GSAP: for example, declarative animations are built using simple primitive functions, and they both have a time-controller to fast-forward and rewind time. redux-time is built specifically for reactive virtual-dom rendering though, whereas GSAP animations are typically applied directly to the DOM. We highly recommend reading GSAP’s docs if you want a more thorough explanation of tweens and this general style of approaching animations.
After spending almost a year contemplating how to do declarative animations cleanly at Monadical, we realized that all state can be represented as layered patches that are a function of time.
On the way we tried many other solutions from using jQuery animations, to react-transition-group, to janky manual approaches w/ setTimeout. Since all those are designed with content transitions in mind, nothing really “clicked” and felt like a clean way to do interactive game animations.
Finally, we settled on the state tree as a function of time approach, and wrote some common animation definition functions, then ported our old UI over! Given its drastic improvement on our codebase and productivity, we feel this library is worth taking a look at if you want to do game-style animations in a declarative, React-friendly manner.
How it works
redux-timedispatches aTICKaction on everyrequestAnimationFrame, which then hits theanimationsreducer.- In the animations reducer,
redux-timeuses the TICK’swarped_timeand each animation’sstart_stateto compute the intermediate state generated by every animation. Each animation has a function like:tick(delta) => {return (delta/duration)*amt}which is passed the delta from itsstart_time. - Finally, all the state produced from each active animation is merged into one object and some translation is done to convert
styles from dictionaries of values to valid CSS strings (e.g.{transform: {translate: {top: 0, left: 10}}}->transform: translate(10, 0)) The dictionary is returned as the newanimations.state, and redux then rerenders any components that got new values.
// redux-time dispatches this for you on every requestAnimationFrame
store.dispatch({type: 'TICK', warped_time: 1499000000})

// then the redux-time animatons reducer uses your Translate's animation.tick(delta) func to compute the animated state:
const new_state = {
    ball: {
        style: {top: 55, left: 0},
    },
}
Redux re-renders components automatically whenever the state they subscribe to with mapStateToProps changes. New animated state is immediately rendered after the animations reducer returns, and the position of the ball updates on the screen!
This process repeats on every animation frame, and the ball state changes on every TICK until the animation finishes.
When would you use this?
A simple game, with animations dispatched from a backend via websocket.
window.initial_state = {
    game: {table: {...}, players: {...}},
}
window.store = createStore(combineReducers({animations}))
window.time = startAnimation(window.store, window.initial_state)
window.socket = new WebSocket('/game_backend')

// when the backend sends us a new gamestate
window.socket.onmessage = (message) => {
    const action = JSON.parse(message)
    if (action.type == 'UPDATE_GAMESTATE') {
        const new_state = action.gamestate
        const {table, players} = new_state
        const animations = Sequential([
            // bounce the ball, rotate the arrow, flash the box red, etc...
            ...get_game_animations(action.animations),

            // once the animations complete,
            // set the whole ui gamestate to the server's state
            Become({
                path: '/game',
                state: {table, players},
                start_time: window.time.getActualTime(),
            }),
        ])
    }
    window.store.dispatch({type: 'ANIMATE', animations: animations})
}
Note: we use window.store, window.socket to refer to the redux store, and a WebSocket connection to the backend respectively. In practice you would architect with dependency injection, so window. is not needed, but we use it here and in the rest of the docs for simplicity.
Contributing
We’d love see PR’s or issues opened if you have questions or suggestions!
If possible, when submitting an issue report, try to copy one of the examples/ files and modify it to illustrate your reproduceable error.
Links
- React Docs on Animation
- react-move: react animations library
- React-f1: stateful animations library
- React-Transition-Group library to add component lifecycle CSS transitions
- React-Transition-Group walkthrough article: UI Animations with React — The Right Way
- GSAP: incredibly robust, stable, well-supported Javascript animations library
- react-animations CSS animations usable with inline-style libraries like StyledComponents
- react-animate library for defining component transitions by extending the React.Component class
- React.rocks: animation examples
- Animate.css: repository of great css animations (usable with redux-time)
Documentation
Documentation is a work-in-progress, if you see anything unclear or incorrect, please submit a PR or issue!
We encourage you to follow along with the demos in examples/ to see how the library works. The examples are short and fairly easy to read!
- Basics
- Installation
- Getting Started
- Rendering Animated State
- Animations API
- What is an animation?
- What is an animation sequence?
- Library-provided animations
- Running & Queueing Animations
- Delayed Animations
- Advanced
- Writing JS Animations
- Composing animations
- Custom tick functions
- Interactive animations
- Writing CSS Animations
- Using CSS
@keyframesanimations - Manual CSS
transform(very advanced) - Manual CSS
animate(very advanced)
- Using CSS
- Writing JS Animations
- Optimization
- Troubleshooting
Basics
Installation
yarn add redux-time
# OR
npm install --add redux-time
Then add this to your page’s entry point, next to createStore:
import {animationsReducer, startAnimation} from 'redux-time'

// add animations to your reducers
window.store = createStore(combineReducers({..., animations: animationsReducer}))

// start the animation runloop off with your initial_state
window.initial_state = {ball: {text: 'Hello world!'}}
window.time = startAnimation(window.store, window.initial_state)
Getting Started
// change some state value instantly
window.store.dispatch({type: 'ANIMATE', animation: Become({
    path: '/ball/text',
    state: 'An instant state change happened!',
    // start_time: Date.now(),     // optional, default is now
    // duration: Infinity,                   // optional milliseconds duration
})})

// animate some state value over time
window.store.dispatch({type: 'ANIMATE', animation: Animate({
    path: '/ball/text',
    start_state: 0,
    end_state: 100,
    start_time: Date.now() + 1000,  // begins after 1000ms
    duration: 10000,
    curve: 'easeInOutQuad',
})})

// use a provided JS animation
window.store.dispatch({type: 'ANIMATE', animation: Rotate({
    path: '/ball',
    start_state: 0,
    end_state: 360,
    duration: 10000,
})})

// use a CSS keyframe animation
window.store.dispatch({type: 'ANIMATE', animation: AnimateCSS({
    path: '/ball',
    name: 'blinker',
    duration: 10000,
    curve: 'linear',
})})
Follow the Walkthrough Example above for a detailed guide, or jump right into the docs below!
Rendering Animated State
Animated state is just normal state that lives under animations.state in your store’s state tree. To render a component that uses animated state, write a container that fetches the props it needs from the animated state tree.
import React from 'react'
import {connect} from 'react-redux'

const SquareComponent = ({style}) =>
    <div style={style}>This square may blink</div>

const mapStateToProps = ({animations}) => ({
    style: animations.state.ball.style
})

const Square = connect(mapStateToProps)(SquareComponent)
If you have some components that are not entirely animated and rely on some parts of your normal state tree, you can merge/mix-and-match the animated state with your normal state in mapStateToProps.
const mapStateToProps = ({animations, users}) => ({
    style: animations.state.ball.style,
    text: (animations.state.ball.text
            ? animations.state.ball.text    // use animated state if present
            : `Hello ${users.logged_in_user.username}!`),  // default if not
})
Most animations will add /style to the path you provide in order to animate any CSS style values. Make sure your component uses the style state produced in animations.state, otherwise nothing will move on your screen, even though the animations are working!
Animations
An “animation” in redux-time is defined as a normal JS object with the following keys:
{
    type,        // human readable description, e.g. TRANSLATE or OPACITY
    path,        // an RFC-6902 style javascript patch path, e.g. /ball/style/top or /path/to/array/0
    start_time,  // determines when animation is active, defaults to immediately Date.now()
    duration,    // duration of the animation in ms (Infinity is allowed)
    end_time,    // optional instead of duration (Infinity is allowed)
    start_state, // initial state of the animation, e.g. {top: 0, left:0}
    delta_state, // total amount to add to the start_state, e.g. {top: 10, left: 0}
    end_state,   // optional instead of delta_state
    curve,       // timing interpolation curve, can be a custom function like bezier() or 'linear', 'easeInOutQuad', etc.
    unit,        // defaults to 'px', can also be 'vw', '%', 'em', null, etc.
    tick,        // function that takes delta from start_time and returns a computed state at that point in time, defaults to:
                 //  tick: (delta) => {
                 //      const progress = start_state + curve_func(delta/duration)*delta_state
                 //      return `${progress}${unit}`
                 //  }
}
On each frame, computeAnimatedState in reducers.js runs through all the animation tick functions,
and applies the computed results as patches to the specified location path in the state tree.
A single animation object can only change one value in the state tree, but you can create an “animation sequence” of multiple animations to change different values or animated some things sequentially. This is helpful when dispatching several animations at once, or for cases such as TRANSLATE_TO, which is actually an animation sequence comprised of two animation objects: TRANSLATE_TO_LEFT and TRANSLATE_TO_TOP.
An “animation sequence” in redux-time is a list of several animations, defined as an Array of the javascript objects above, like so:
[
    {type: ROTATE, ...}
    {type: TRANSLATE_TO_LEFT, ...},
    {type: TRANSLATE_TO_TOP, ...},
    ...,
]
When queueing up an animation, you can pass either a single “animation”, or an “animation sequence” (Array of animations):
// a single animation
store.dispatch({type: 'ANIMATE', animation: Become(...)})

// an animation sequence
store.dispatch({type: 'ANIMATE', animations: [Become(...), Translate(...), Rotate(...)]})
Functions which take and produce sequences operate on only their expected types, and throw helpful errors if you pass a single object instead of a sequence.
Typically, you wont create animations objects by hand, but rather use some of the provided animation functions.
Provided Animation Functions
import {...} from 'redux-time/src/animations'

// Basics

    // set some state without animating.  not everything is animates, some stuff you want to have
    // snap into place instantly. Become is the most common "animation" of all.
    Become({path='/', state={}, start_time=now, end_time=Infinity, duration=Infinity})

    // the building block of all others, just interpolates a raw value or object
    // over some time, at the specified path, with the specified tick function
    Animate({type, path, start_time, end_time, duration, start_state, end_state, delta_state, curve='linear', unit=null, tick=null})

// CSS Animations

    // animate an animation defined in CSS  .e.g  @keyframes blinker {from {opacity: 1.0;} to {opacity: 0.0;}}
    AnimateCSS({name="blinker", path, start_time, end_time, duration=1000, curve='linear'})

    // check out Animate.css for awesome animations to use with this ^
    // https://github.com/daneden/animate.css

// JS Animations

    // move an element relative to its current position, using transform: translate(x, y)
    Translate({path, start_time, end_time, duration=1000, start_state, end_state, delta_state, curve='linear', unit='px'})

    // animate an element changing opacity
    Opacity({path, start_time, end_time, duration, start_state, end_state, delta_state, curve='linear', unit=null})

    // rotate an element using transform: rotate(deg)
    Rotate({path, start_time, end_time, duration, start_state, end_state, delta_state, curve='linear', unit='deg'})

    // have an idea? contribute an animation by submitting a PR to src/animation.js
    // .e.g Wobble({...}), Bounce({...})

// Composable Higher-Order Animations (aka functions)

    // make each animation in a sequence start after the last one ends
    Sequential([animation, ...], start_time=1500000000000)

    // repeat a single animation
    Repeat(animation, repeat=Infinity)

    // repeat a sequence of animations in order
    RepeatSequence([animation, ...], repeat, start_time=1500000000000)

    // reverse a single animation
    Reverse(animation)

    // reverse a sequence of animations in order
    ReverseSequence([animation, ...], start_time=1500000000000)
Running & Queueing Animations
To up queue an animation that you want to run, dispatch the ANIMATE action:
// for a single animation, use animation:
store.dispatch({type: 'ANIMATE', animation: Become({...})})

// for a sequence of animations (most common), use animations:
store.dispatch({type: 'ANIMATE', animations: [...]})
Delayed Animations
To queue an animation that you don’t want to have start immediately, set the start_time of your animation to window.time.getActualTime() + delay:
const delayed_rotate = Rotate({
    path: '/square',
    start_time: Date.now() + 1000,   // to start 1sec from now
    duration: 1000,
    start_state: 0,
    delta_state: 360,
})
store.dispatch({type: 'ANIMATE', animation: delayed_rotate})
You can use start_time to build up a sequence of animations that overlap or run in a particular order. You can also use the Sequence function to create a list of sequential animations that run one by one.
Advanced
State Tree
I you have some existing state elsewhere in your redux state-tree that you want to augment with redux-time:
const mapStateToProps = ({ball, animations}) => ({
    ball_style: deepMerge(ball.style, animations.state.ball.style),
})
Custom Animations
Composing Existing Animations
We provide several animations.js functions that operate on “animation sequences”, a.k.a lists of animations, but you can also write your own.
Sequential: play a list of animations one after another (so you dont have to do math onstart_timemanually)Repeat: repeat a single animationRepeatSequence: repeat a list of animations in orderReverse: reverse the direction of a single animationReverseSequence: reverse a list of animations in order
Here’s an example of using Sequential and RepeatSequence together:
const bounce_ball = Sequential([
    Translate({
        path: '/ball',
        start_state: {top: 0, left: 0},
        end_state: {top: 100, left: 0},
        duration: 500,
    }),
    Translate({
        path: '/ball',
        start_state: {top: 100, left: 0},
        end_state: {top: 0, left: 0},
        duration: 500,
    }),
])
store.dispatch({type: 'ANIMATE', animations: RepeatSequence(bounce_ball, 10)})
Custom JS Tick Functions
If you don’t want to use one of the provided animations in animations.js, or if you want to write your own, just pass a custom tick function to Animate().
store.dispatch({type: 'ANIMATE', animation: Animate({
    path: '/path/to/your/state/value',
    duration: 1000,
    start_state: 0,
    delta_state: 100,
    tick: (delta) => {
        // e.g. stepped value instead of smoothly changing continuous value
        if (delta <= 0) return 0
        if (delta <= 250) return 25
        if (delta <= 500) return 50
        if (delta <= 750) return 75
        if (delta <= 1000) return 100
    }
})})
Interactive Animations
You can also use custom tick functions to do interactive animations, e.g. a ball that follows the user’s mouse. Interactive animations are by definition impure (since they depend on real-time user input), so time travel will not work to rewind/fast-forward them.
window.onmousemove = (e) => {
    window.mouseY = e.pageY
    window.mouseX = e.pageX
}
const getCursorPosition() => ({
    top: window.mouseY,    // you could put more complex interactive logic here
    left: window.mouseX,   //    e.g. window.innerWidth * getZoomLevel() - 100
})
store.dispatch({type: 'ANIMATE', animations: [
    Animate({
        path: '/ball/style/top',
        duration: Infinity,
        tick: () => getCursorPosition().top - 50
    }),
    Animate({
        path: '/ball/style/left',
        duration: Infinity,
        tick: () => getCursorPosition().left - 50
    }),
]})
Writing CSS Animations
To write a custom CSS animation, first define a @keyframe animation in your CSS file:
@keyframes blinker {
    from  {opacity: 1.0;}
    to    {opacity: 0.0;}
}
Then write a component to render:
import React from 'react'
import {connect} from 'react-redux'

const SquareComponent = ({style}) =>
    <div style={style}>This square will blink</div>

const mapStateToProps = ({animations}) => ({
    style: animations.state.ball.style
})

const Square = connect(mapStateToProps)(SquareComponent)
Then, dispatch an AnimateCSS animation to use your @keyframe animation:
const blink = [
    AnimateCSS({
        path: '/ball',     // AnimateCSS will set /ball/style/animation/blinker
        name: 'blinker',   // name of the keyframe animation above
        duration: 1000,    // duration of the animation in milliseconds
        curve: 'linear',   // see all options in src/util.js: EasingFunctions
    })
]
store.dispatch({type: 'ANIMATE', animations: blink})
Manual Animations for CSS transform
You can animate CSS transform functions by using one of the provided animation functions like Rotate or Translate. The following is only for advanced manual control over the CSS transform strings produced.
To manually animate a transform value, specify a path like so:
Animate({
    path: '/ball/style/transform/translate3d',
    start_state: {x: 0, y: 0, z: 0},
    ...
})
All patches are stored internally as a dictionary of {transform_function_name: value}, but they get converted to strings when the animated state is computed on every TICK.
Your component will receive style={transform: 'translate3d(x, y, z)} as a valid CSS string, so you can plug it right in with style={style} and it will work.
You can also animate multiple transform functions to be applied at once:
Animate({
    path: '/ball/style/transform/translate3d',
    start_state: {x: 0, y: 0, z: 0, order: 0},   // lower order key comes first
    ...
})
Animate({
    path: '/ball/style/transform/rotate3d',
    start_state: {x: 0, y: 0, z: 0, order: 1},
    unit: 'deg',
    ...
})
Which gives a string like this to your component:
style={transform: 'translate3d(0px, 0px, 0px) rotate3d(0deg, 0deg, 0deg)'}
The function wich merges all the transform functions into a final string is called flattenTransform in src/util.js.
Manual Animations for CSS animation
You can animate CSS animations normally by using AnimateCSS. The following is only for advanced manual control over the CSS animation strings produced.
To manually set or animate a CSS animation value, specify a path like so:
Become({
    path: '/ball/style/animation/css_animation_name',  // name of the @keyframe
    state: {
        name: css_animation_name,
        duration: 1000,
        delay: 100,
        playState: 'paused',
    }
})
All CSS animations are stored internally as a dictionary of {css_animation_name: {name, duration, delay, playState}}, but they get converted to strings when the animated state is computed on every TICK.
Your component will receive style={animation: 'blink 1000ms linear -25ms paused'} as a valid CSS string, so you can plug it right in with style={style} and it will work.
You can also set multiple css animations to be applied at once:
Become({
    path: '/ball/style/animate/fadeInRed',
    start_state: {..., order: 0},   // lower order key comes first
    ...
})
Become({
    path: '/ball/style/animate/flipInX',
    start_state: {..., order: 1},
    ...
})
Which gives a string like this to your component:
style={animation: 'fadeInRed 1000ms -25ms paused, flipInX 1000ms -25ms paused'}
paused is used with negative delays to let us step through the animation frame-by-frame instead of letting the GPU render it continuously on another thread. It’s needed in order to let TICK render each specific frame when needed via javascript.
The function which merges all the animation functions into a final string is called flattenAnimation in src/util.js.
Optimization
In our benchmarks redux-time takes about 0.5ms to compute the state for 100 animations. This means that the bottleneck for animation FPS is usually going to be in React & DOM (recalculating styles, paint, etc) rather than redux-time, until you hit about ~2000 active animations.
These are some great articles on optimizing react/redux code in general:
- https://marmelab.com/blog/2017/02/06/react-is-slow-react-is-fast.html
- https://reactrocket.com/post/react-redux-optimization/
- http://redux.js.org/docs/recipes/ComputingDerivedData.html
- https://medium.com/outsystems-experts/how-to-achieve-60-fps-animations-with-css3-db7b98610108
React Optimization
Step one is to make sure you’ve taken care of all the low-hanging-fruit react optimization in the articles above.
Check out Inferno and Preact if you need a faster VirtualDOM engine than React.
Redux Optimization
Make your React components purely functional, and use mapStateToProps to compute all the state needed for rendering. That way components only re-render when their parameters actually change.
Make sure you understand how shallowEquals works in react-redux, and make sure that your props values have the same reference if they haven’t changed, and a different reference if they have. Mutation is the root of all evil!
Redux-Time Optimization
We take care of most of the optimization for you. Animations are only computed if they aren’t overwritten by other animations, and patches are only computed for the currently active animations. Our internal functions are memoized and optimized to be JIT-ed.
If you encounter high memory use, try reducing animations.max_time_travel to something low such as 100. This will prevent you from going as far forwards/back in time, but it will use less memory.
If you see a particular slowdown that you think is in redux-time, please submit an issue and we’ll gladly take a look!
Troubleshooting
WIP
| MIT License | Monadical SAS 2017 (we’re hiring!) |
